

So I can finally write up my Side Quest, I have at this point made it to Side Quest 2, however have not made it much further due to other commitments.
That said doing Side quest 1 was a real joy!
The Objectives were as follows
- Identify the Wifi Network from the PCAP File
- Obtain the WIFI Password
- Identify what tools the attacker used
- Get the Case number from the targets e-mail
- Get the Content of the yetikey1.txt File
Objective 1: Identify the WiFi SSID
This task was relatively straight forward, however I will take you through the process I took.
First I made a decision on whether to use TShark or Wireshark. I chose Wireshark, though I may do a writeup with TShark to add an extra challenge.
Once ready, I opened the PCAPNG File in Wireshark.
Upon review I can quickly identify the WIFI SSID.

Objective 2: Get the WiFi Password
Getting the WiFi password is important in this task, without it I am unable to review the packets captured.
I will need to run the capture through Aircrack-ng to obtain the WiFi Password. However there is a problem, Aircrack-ng reads PCAP’s and not PCAPNG Files. This means I will need to convert the file.
To do this I used TShark. You can see below the usage.
- -r = Read the file X
- -w = Write to a file
- -F = Format the file to pcap using libpcap to define the formatting.
tshark -r VanSpy.pcapng -w foo.pcap -F libpcapOnce completed, I then went ahead and ran aircrack-ng. To do this I used details from the initial review of the capture in Wireshark. I also used rockyou.txt wordlist.
Specifically I needed the WiFI interface (WiFi AP) MAC Address.

- -b defines the broadcast MAC
- -w is the wordlist to use
- Filename at the end is the file you are creating for the conversion, and where the data will be written to.
I let aircrack-ng do it’s job and in 7 seconds …

Now I need to do something with the information to review the capture in Wireshark.
I take the Key and add it to the preferences in Wireshark under IEEE 802.11
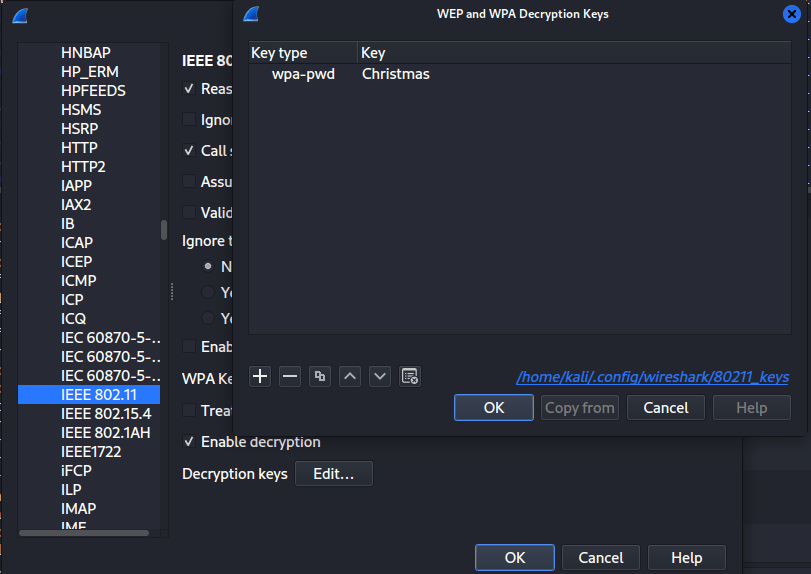
Done, I can now review the packets sent over the WiFI network.
Each packet is decrypted using the key.
Objective 3: Tools in use
To start this task I used the built in Statistics tools within Wireshark.
Looking at the Stats I noticed a lot of traffic under the TCP 1006 Tab (1006 defined the number of distinct conversations). I then arranged the data so that the Byte count was in descending order. Looking at port B I noticed something odd. I recognised the traffic for several different communications, and then really focused in on one specific (and known) port of 4444.

Why you may ask! Well I have a feeling that the traffic being sent over 3389 is going to be RDP Traffic.
22 is likely SSH.
However 4444 is a default port for several tools, such as metasploit. E.g.

I can now use Wireshark and follow the TCP Stream. This traffic is in plain!
It is worth noting that I had looked at the RDP traffic at this point as well. Fully expecting to hit a brick wall with it. I won’t spoil one of the reasons just yet 😉 But, ultimately the traffic is representative of graphical user access to a target system… Quite difficult to read even if ….. 😉
Ok back to the point.
We can see here the traffic on port 4444.
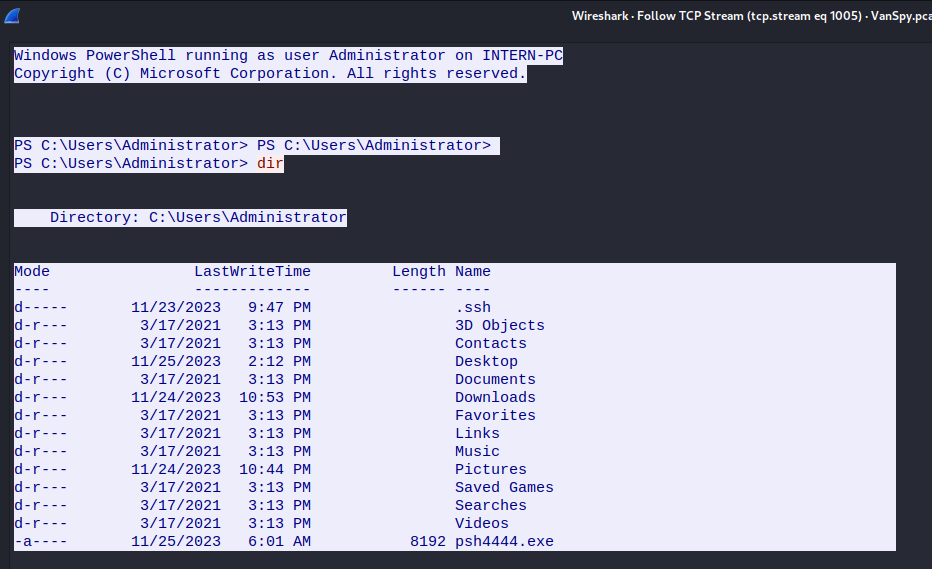
Following on from this I am then able to see (in red) what the client (TA) was doing and what the server (target) was presenting.
It seems the threat actor had been able to gain administrative access to the target system, as they were able to get administrative access to the box.
I can also note the “odd” executable of psh4444.exe, this suggests to me the that the backdoor was likely setup via this, but that is speculation.

Back on track, the task wants to know what tool was used. You may have spotted it in the screen shot. It is Mimikatz! There is a big clue in the download and commands being run, but also the traffic between the two systems displays this :

TASK COMPLETE!
Objective 4 : Get the Case number from the targets e-mail
Here is where things got interesting.
My first thought was to try and read the packets, but there is a level of security between the client and the target system, namely the traffic is encrypted by RSA’s RC4 Block Cipher.
For more on this check this article :- https://www.cyberark.com/resources/threat-research-blog/explain-like-i-m-5-remote-desktop-protocol-rdp
In short though this image helps understand the stack and what we can see… at this stage anyway.
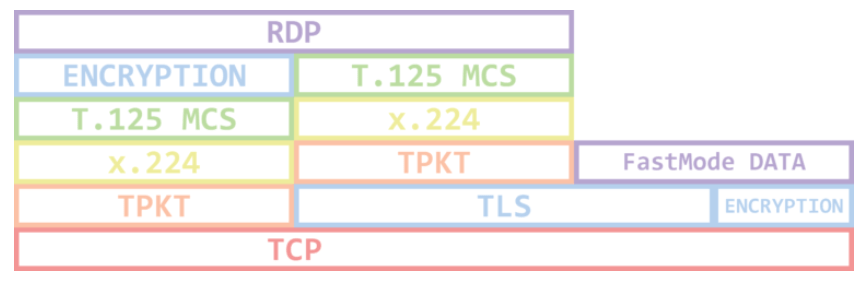
Note how the Encryption fits into the RDP protocols Stack. All data within, is encrypted… if only there was a way to decrypt the information… I probably need a key or a certificate.
…WELL…
This is where following the attackers path comes into play, and how Mimikatz was used.
You may have noted that the above execution of mimikatz was run like so;
cmd /c mimikatz.exe privilege::debug token::elevate crypto::capi "crypto::certificates /systemstore:LOCAL_MACHINE /store:`"Remote Desktop`" /export" exitLooks to me like the attacker may have exported the certificates used for encrypting the data between the target and a system they were accessing.
And guess what, the TA did!

Continuing my investigation of the traffic between the attacker and target I can see how they exfiltrated the cert. Specifically the .pfx file.
The attacker took the file and converted it to a Base 64 string.

This is GREAT! I can use this same information to create the certificate on my side.
Now to run it through CyberChef!… I could also do the conversion straight from the terminal, but my preference was to do it this way.

base64 --decode file.name > newfilenameNow to get the RSA certificate
┌──(kali㉿kali)-[~/thmsidequest/new]

└─$ ls

test.pfx


┌──(kali㉿kali)-[~/thmsidequest/new]

└─$ openssl pkcs12 -in test.pfx -clcerts -nokeys -out cert.pem

Enter Import Password:


┌──(kali㉿kali)-[~/thmsidequest/new]

└─$ ls

cert.pem  test.pfx


┌──(kali㉿kali)-[~/thmsidequest/new]

└─$ cat cert.pem

Bag Attributes

    localKeyID: 01 00 00 00

subject=CN = INTERN-PC


issuer=CN = INTERN-PC


-----BEGIN CERTIFICATE-----

MIIC1jCCAb6gAwIBAgIQURufPz/h1a1MMvAdOtmx/zANBgkqhkiG9w0BAQsFADAU

MRIwEAYDVQQDEwlJTlRFUk4tUEMwHhcNMjMxMTIyMjExODE5WhcNMjQwNTIzMjEx

..... [PRUNED for brevity]

-----END CERTIFICATE-----


┌──(kali㉿kali)-[~/thmsidequest/new]

└─$ openssl x509 -in cert.pem -pubkey -noout > pubkey.pem


┌──(kali㉿kali)-[~/thmsidequest/new]

└─$ cat pubkey.pem

-----BEGIN PUBLIC KEY-----

MIIBIjANBgkqhkiG9w0BAQEFAAOCAQ8AMIIBCgKCAQEA2FZSeIpWFleENYSyf7cv

O8vcbuS/MqnpKd7r0qeAtPa2pBM5Fzx3g5tMUecXlOrpCKSivBcTlmdXmxN6lCSE

..... [PRUNED for brevity]

-----END PUBLIC KEY-----


┌──(kali㉿kali)-[~/thmsidequest/new]

└─$ openssl pkcs12 -in test.pfx -nocerts -out prv.pem

Enter Import Password:

Enter PEM pass phrase:

Verifying - Enter PEM pass phrase:


┌──(kali㉿kali)-[~/thmsidequest/new]

└─$ cat prv.pem

Bag Attributes

    Microsoft Local Key set: <No Values>

    localKeyID: 01 00 00 00

    friendlyName: TSSecKeySet1

    Microsoft CSP Name: Microsoft Enhanced Cryptographic Provider v1.0

Key Attributes

    X509v3 Key Usage: 10

-----BEGIN ENCRYPTED PRIVATE KEY-----

MIIFHDBOBgkqhkiG9w0BBQ0wQTApBgkqhkiG9w0BBQwwHAQI8twoxV4dFvwCAggA

..... [PRUNED for brevity]

-----END ENCRYPTED PRIVATE KEY-----


┌──(kali㉿kali)-[~/thmsidequest/new]

└─$ openssl rsa -in prv.pem -out prvrsa.pem

Enter pass phrase for prv.pem:

writing RSA key


┌──(kali㉿kali)-[~/thmsidequest/new]

└─$ cat prvrsa.pem

-----BEGIN RSA PRIVATE KEY-----

MIIEowIBAAKCAQEA2FZSeIpWFleENYSyf7cvO8vcbuS/MqnpKd7r0qeAtPa2pBM5

Fzx3g5tMUecXlOrpCKSivBcTlmdXmxN6lCSET7jPLdhBrF6lvcsirxkJAT+jm2Be

..... [PRUNED for brevity]

-----END RSA PRIVATE KEY-----
Now lets get back to my old friend Wireshark!
I have a few options here, I can look to try and analyse the session and review the Hex dumps, or maybe I can replay the session.
I started by adding the RSA key to Wireshark. After a few seconds the data within the packet capture reloads and I am able to see… well not much more, however I am noticing some clear text information that previously wasn’t present.

For reference I read this page https://wiki.wireshark.org/RDP.md
I’m now following the TLS Stream and not the TCP Stream
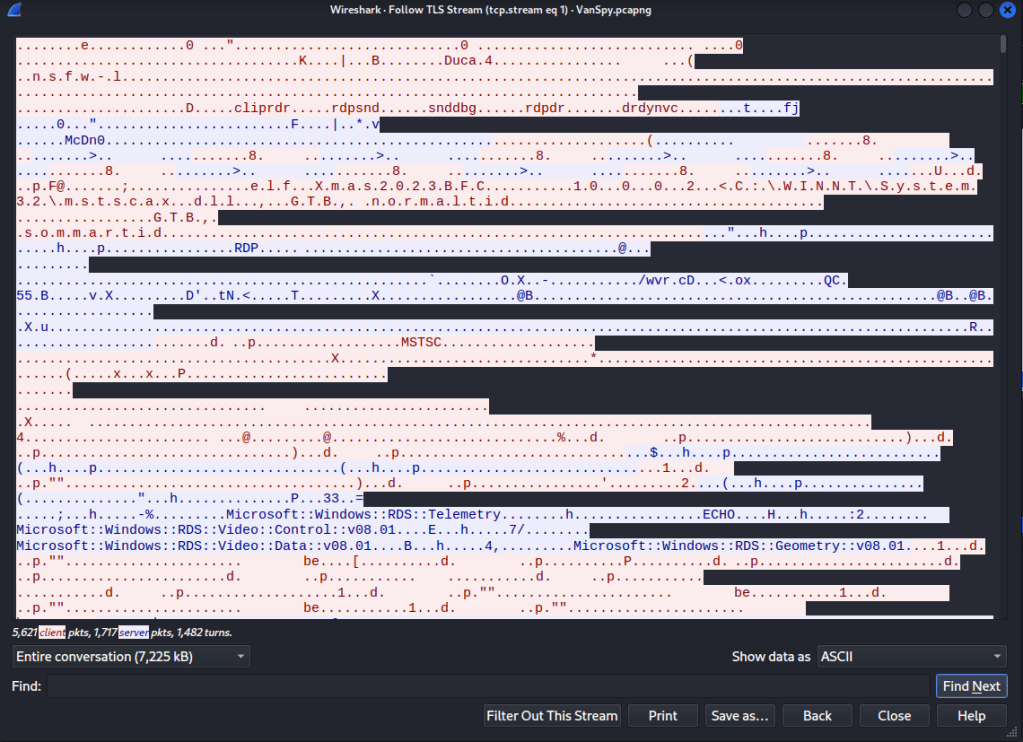
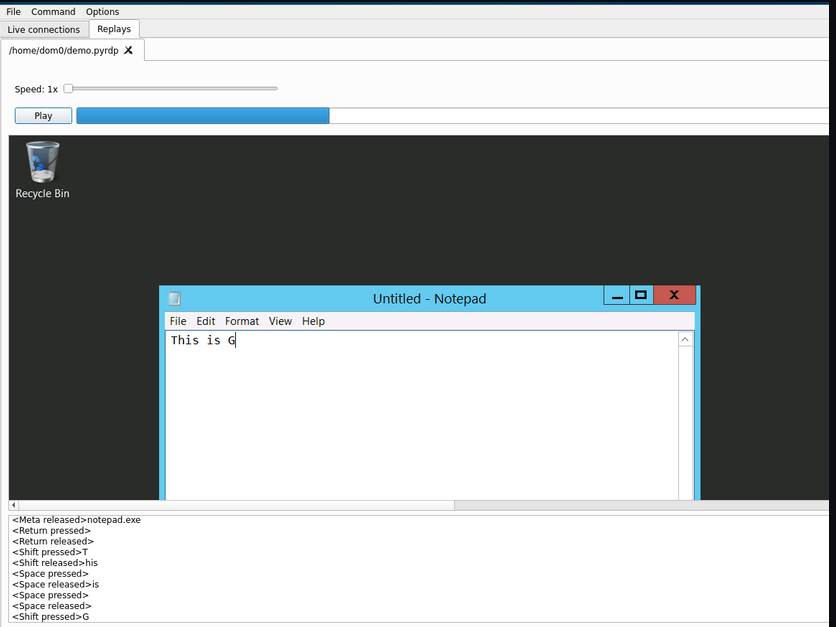
Ok so this is where I got stuck… the question is why? Well like all good rabbit holes, I went too deep. I was trying to figure out how to reverse engineer what I was looking at, could I build or make something that would show me the information I was looking for, like key strokes. I started looking at the hex values and trying to identify key presses that would have been sent over the RDP channel.
I found some interesting information while reviewing some of the packets, such as;
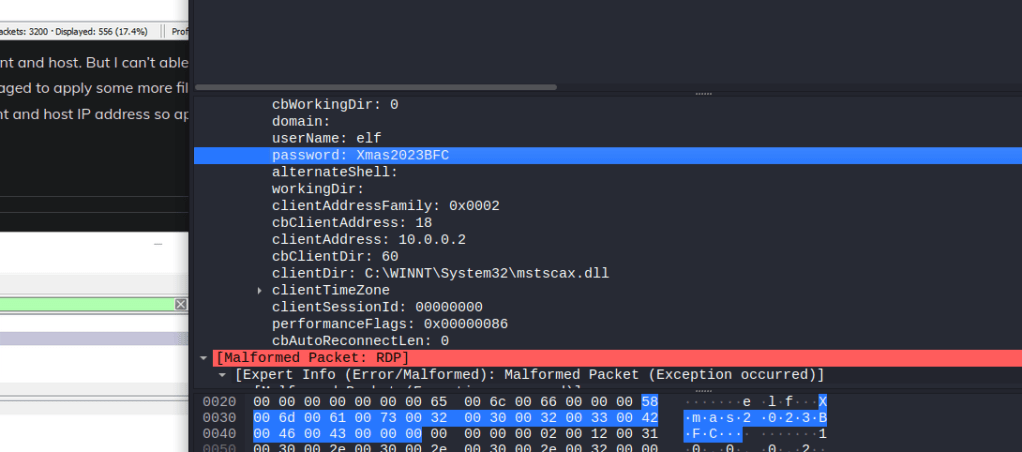
You can see I found a credential in the pcap… but this is not enough.
Then I remembered a few things. Specifically back to a time I learned how to replay a voice call from a PCAP. This triggered a new set of thoughts. What if I could simply replay the session in “real time”… I’m sure I’m not the first person to have thought about this!
I wasn’t 🙂
After a bit of hunting around I landed on a tool, pyrdp-player
https://github.com/GoSecure/pyrdp
In short this tool is written in python and would allow me to review the RDP traffic as if the session was happening right in front of my eyes!
Straight from the readme:
I grabbed the binaries from git.
Setting up PYRDP-Player
This turned out to be a relatively simple task. I followed the documentation and had the binary running successfully. But this wouldn’t be a write up with out detailing the steps!
- Download pyrdp-player
- python3 -m venv venv
- source venv/bin/activate
- pip3 install -U pop setuptools wheel
- pip3 install -U -e ‘.[full]’
Ah ha! We can now run the player… BUT there are limitations and I need to give it the right data to start with.
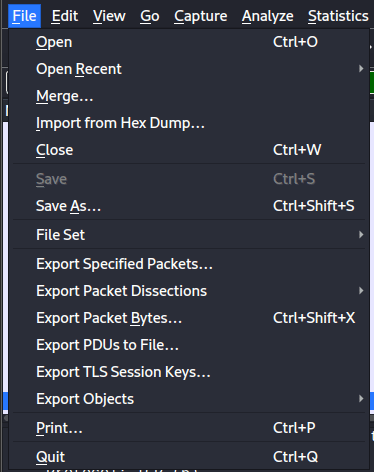
Back in Wireshark I needed to export the PDUs to file.
First thing I do is to make sure the TLS Keys are loaded, so from Wireshark I performed an export.
I then added these to the TLS Preferences.

Following the guide I then export the data to PDU OSI Layer 7
I also had limited the the file to only show the conversation I was interested in. I had made my decision on which conversation based on the statistics I used earlier, specifically looking the the most “chatty” conversation.
I ran the export and created a file called RDPEXTRACT.pcap
I then ran the file through the pyrdp-converter that came with the tools.

FINALLY
It was time to see if it worked!
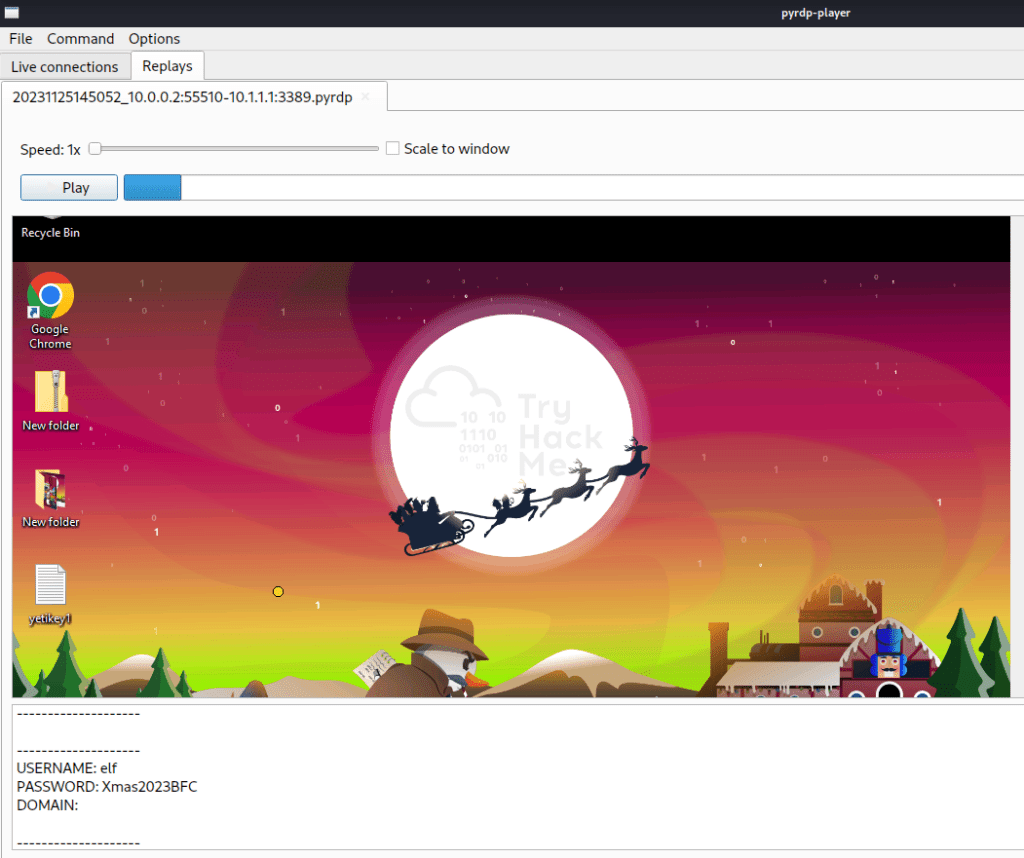
It did!
Interestingly I spotted the credential I found in plain while investigating the pcap as well.
I’m close to finishing this task, I can taste it!
Watching the play back I can see the user logging into their gmail account.
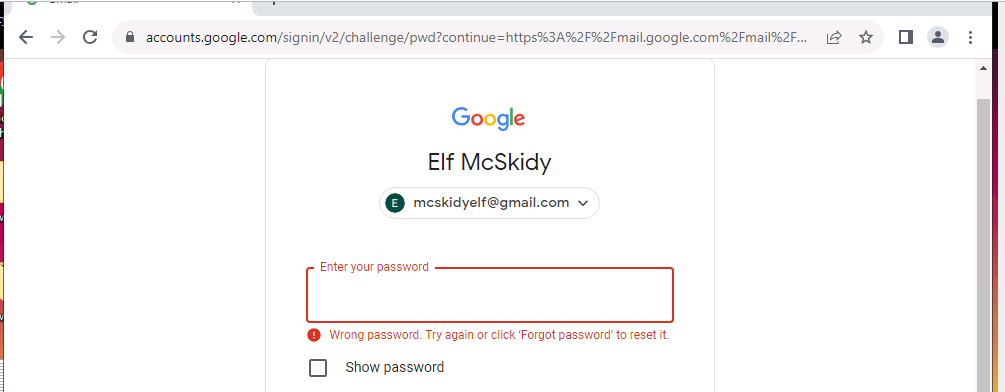

Inside the recording and inside this e-mail I can see the case number!
Objective 5 : Get the Content of the yetikey1.txt File
At this point I was thinking how am I going to get access to the file in the recording!? Reference the above desktop image to see the file.
I watched the key press log running up the screen
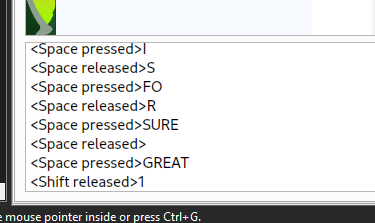
Suddenly I spot it. Elf wants to send the file.
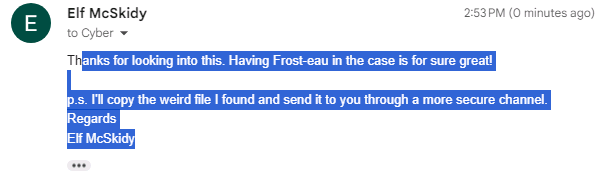
They are going to copy the file! This got me thinking “how do I get a file out of the rdp session”, I know I can retrieve files out of Wireshark. I know it could be transferred via the terminal sessions Virtual channels.
Then I see Powershell is opened.
Clipboard redirection is on.

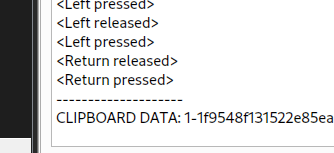
And that was it! All flags captured. Now I just had to wait for Side quest 2 to be released.
